Waders & Boots · Buying guide
How to Repair Waders That Leak
Almost every wader leak is a pinhole you cannot see, in a place you can predict. Here is how to find it in twenty minutes, how to fix each kind of failure properly, what to never put on a breathable wader, and the point at which replacing is the cheaper answer.
Disclosure: Creek Cover is reader-supported. If you buy through our links we may earn a commission, at no extra cost to you. It never changes which pick we tell a new angler to start with. Full disclosure.
Quick picks at a glance
Tap a pick to read the full write-up, or the price button to check it on Amazon.
- 1
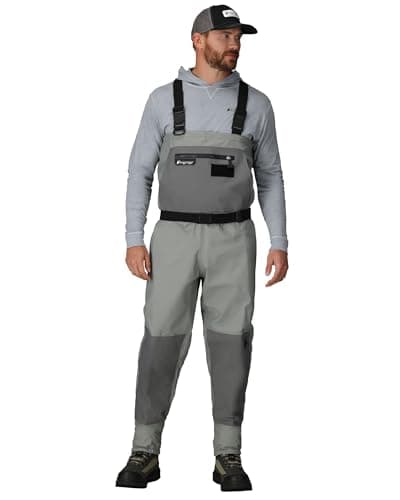
When a pair has been patched three times, you are maintaining a failing garment rather than fixing a fault. This is the pair to replace into: a four-ply breathable upper with double-reinforced knees, which is the single most useful construction detail on a wader because knees are where fabric abrades first — every time you kneel on gravel to land a fish or climb a bank. Stockingfoot, so your existing boots carry over.
Best for: The replacement that stops the repair cycle - 2
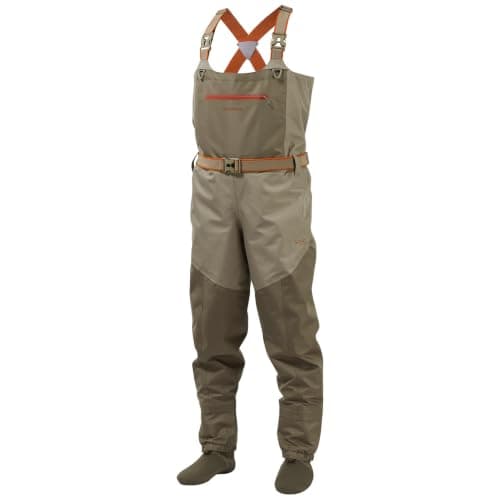
A sensible middle option if your old pair has failed and you do not want to spend premium money again. Breathable stockingfoot construction with zippered chest and hand-warmer pockets, at a price between the budget pairs and the reinforced ones. Buy it understanding the trade: fewer reinforcement panels than the Frogg Toggs pair, so look after the knees and keep a repair tube in the car.
Best for: The mid-price replacement, with pockets - 3
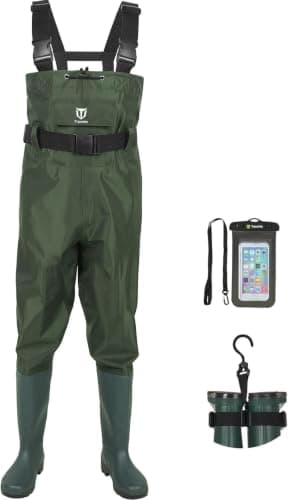
Sometimes the honest answer is a cheap bootfoot pair to get you through the season while you decide. These cost about what two tubes of repair adhesive and a wasted Saturday cost, the attached boots mean nothing else to buy, and they will keep you dry for a reasonable number of trips. Treat them as a stopgap rather than a long-term wader — the attached boot is the part that limits them.
Best for: The cheap stopgap when a repair has to wait
| # | Product | Best for | Score | Price |
|---|---|---|---|---|
| 1 | Frogg Toggs Hellbender PRO Breathable Stockingfoot Chest Wader When a pair has been patched three times, you are maintaining a failing garment rather than fixing a fault. This is the pair to replace into: a four-ply breathable upper with double-reinforced knees, which is the single most useful construction detail on a wader because knees are where fabric abrades first — every time you kneel on gravel to land a fish or climb a bank. Stockingfoot, so your existing boots carry over. | The replacement that stops the repair cycle | — | $169.99View on Amazon#ad |
| 2 | BASSDASH Men's IMMERSE Breathable Stockingfoot Chest Waders A sensible middle option if your old pair has failed and you do not want to spend premium money again. Breathable stockingfoot construction with zippered chest and hand-warmer pockets, at a price between the budget pairs and the reinforced ones. Buy it understanding the trade: fewer reinforcement panels than the Frogg Toggs pair, so look after the knees and keep a repair tube in the car. | The mid-price replacement, with pockets | — | $109.98View on Amazon#ad |
| 3 | TIDEWE Chest Waders for Men and Women, Waterproof Fishing Waders Sometimes the honest answer is a cheap bootfoot pair to get you through the season while you decide. These cost about what two tubes of repair adhesive and a wasted Saturday cost, the attached boots mean nothing else to buy, and they will keep you dry for a reasonable number of trips. Treat them as a stopgap rather than a long-term wader — the attached boot is the part that limits them. | The cheap stopgap when a repair has to wait | — | $51.99View on Amazon#ad |
Most leaking waders are leaking through pinholes at the knees, the seat or the inside thigh, and the fix is a flexible urethane repair adhesive applied from the inside and left to cure flat for 24 hours. The hard part is not the repair, it is finding the hole — and the two methods below find it in about twenty minutes. If your pair has already been patched several times, skip to when to replace instead, because the arithmetic changes.
One note on products before anything else: this page tells you which repair materials work, but we do not carry a wader repair kit in our own product registry and will not point you at one we have not checked. Buy a urethane wader repair adhesive or a UV-cure wader patch from any fly shop or outdoor retailer — the picks on this page are the replace-side options for when a repair is no longer the right call.
Find the leak first
Wet legs do not tell you where the hole is. Water tracks downward inside a wader, so a damp shin very often comes from a pinhole at the knee or higher. Patching where you felt the water is the most common wasted repair.
Method one: the flashlight, in a dark room. Turn the waders inside out, take them into a completely dark bathroom, and run a bright flashlight slowly along the inside while someone looks at the outside — or push the light inside a leg and look from outside yourself. Pinholes show as bright points. This finds the majority of fabric leaks and costs nothing.
Method two: alcohol or soapy water, for the holes light misses. With the waders dry and right side out, wipe a suspect area with rubbing alcohol: it soaks instantly through a pinhole and shows as a dark spot on the inside. Alternatively, fill the legs with water and look for beads forming outside — effective, but you then have to dry them fully before you can repair anything.
Mark every hole you find, then look for more. Use a permanent marker or a small piece of tape, and keep going after the first one. Pinhole leaks usually come in groups because they come from one cause — a season of kneeling, or fabric chafing at the same point.
Look here first
The three kinds of leak
| Type | Looks like | Cause | Fixable? |
|---|---|---|---|
| Fabric pinhole | A single bright point of light, often several together | Abrasion from kneeling, brush, gravel, or flexing at the crotch | Yes — the standard urethane adhesive repair |
| Seam tape failure | A line of seeping along a stitched seam; tape lifting inside | Heat, age, hard washing, or storage folded in a hot car | Usually — flexible adhesive or iron-on seam tape |
| Bootie or gravel-guard seam | Wet foot with a dry leg | Flexing where neoprene meets fabric, or a boot rubbing the guard | Often — neoprene cement, but it is the hardest repair |
| Delamination | Fabric layers separating; a cloudy, bubbled inner surface | The laminate has failed across an area, not at a point | No — this is the end of the garment |
Repairing a pinhole
Clean and dry the area completely. Repair adhesive does not bond to damp fabric, grit, fish slime or sunscreen residue. Wipe the spot with rubbing alcohol, let it flash off, and make sure the fabric is dry right through. If the waders have been wet, give them a full day inside first.
Work from the inside where you can. An inside patch is protected from abrasion and from UV, and it puts the adhesive on the side the water is pushing against. Turn the leg inside out, lay it flat on a table with the hole facing up, and support it so the area is not stretched.
Apply a thin coat over a coin-sized area, not a blob on the hole. A pinhead-sized drop spread to roughly the size of a quarter bonds far better than a thick dome, which stays flexible on the surface and brittle underneath. Two thin coats, the second once the first is tacky, beat one thick one.
Cure it flat for 24 hours before it gets wet. Urethane adhesives cure by reacting with moisture in the air and need time; a UV-cure patch sets in minutes in sunlight, which is what makes it the right thing to carry in a pack for a streamside fix. Either way, leave the repair flat and unstretched while it sets.
Repairing a seam
Seam leaks are the tape failing, not the stitching. Breathable waders are sewn and then taped on the inside, because the stitch holes themselves would leak. When you see a line of damp along a seam, the inside tape has lifted or cracked rather than anything breaking.
Flexible adhesive along the lifted section is the practical fix. Turn the wader inside out, find where the tape has lifted, clean it, and run a thin bead of urethane adhesive along and slightly over the edge of the tape. Press it down and cure flat. Iron-on seam tape also works but needs a low heat and a pressing cloth, and too much heat damages the laminate permanently.
Be honest about the prognosis. A single lifted section repairs well. Tape that is cracking in several places is telling you the garment has aged out — the adhesive under all of it is the same age. That is a replace signal rather than a repair job, and the pairs worth replacing into are compared in the most durable waders roundup.
Booties and gravel guards
A wet foot with a dry leg means the bootie. The joint where the neoprene bootie meets the fabric leg flexes with every step and is the hardest-working seam on the garment. Neoprene cement is the correct material here, not fabric adhesive, and it works best applied to both surfaces, left to go tacky, then pressed together.
Gravel guards tear at their stitching, and that leak is real. The guard itself is not waterproof, but the stitching that attaches it to the leg passes through the laminate. If the guard is pulling away, the holes it leaves behind need sealing from the inside with urethane adhesive.
A lot of bootie damage is boot-related. A boot that is too small compresses the bootie and chafes it; a boot that is too large lets the bootie move and abrade. If you have replaced a bootie seam twice, check your boot sizing — the method is in how to size waders, and the fit question in wading boots for wide feet.
What never to use
Duct tape. It holds for an afternoon, leaves adhesive residue that stops a proper repair bonding later, and pulls the surface coating off breathable fabric when it comes away. If you must get through one session, use it on the outside and clean the area thoroughly afterward.
Silicone bathroom sealant, hot glue and cyanoacrylate. Silicone will not bond to wader laminate and nothing will bond over it afterward. Hot glue is rigid and cracks at the first flex. Super glue makes a hard, brittle spot that tears the fabric around it. All three make a repairable leak into a permanent one.
Heat, in any form. No tumble dryer, no hair dryer, no radiator, no leaving them on a dashboard. The waterproof laminate and the seam tape adhesive are both heat-sensitive, and heat damage shows up as delamination that cannot be repaired at all.
Detergent and fabric softener. Detergent residue blocks the breathable membrane and strips the outer water-repellent finish; softener coats the fabric and stops it venting. Rinse in cold water, or use a technical wash made for waterproof garments.
Stopping the next one
Wear a belt and stop the fabric bunching. Excess fabric folded at the crotch and flexing in the same place every step is the most common cause of pinholes in that area — which is why inseam fit matters more than people expect when buying waders.
Hang them, dry, inside out, not folded. Hang from the feet or over a broad hanger so there is no sharp crease, dry the inside as well as the outside, and keep them out of sunlight. Waders stored folded in a hot vehicle for a summer are the single most reliable way to destroy seam tape.
Rinse the grit off after the trip. Fine sand inside the leg is an abrasive that works on the fabric every time you walk. A cold rinse inside and out takes two minutes and removes the mechanism behind most pinholes.
Kneel less, or buy knees that expect it. If you kneel to land fish or to cast from cover — which small-stream fishing encourages — reinforced knees are worth paying for. The general buying case is in the fly fishing wader roundup.
When to replace instead
| Situation | Do this | Why |
|---|---|---|
| One or two pinholes, fabric otherwise sound | Repair — adhesive, 24 hours, back on the water | A few dollars against a few hundred |
| A single lifted seam section | Repair with flexible adhesive or seam tape | Localized failure, good prognosis |
| Third repair this season, new holes each time | Replace | The fabric is abrading generally — you are chasing it |
| Seam tape cracking in several places | Replace | All the tape is the same age; more will fail |
| Delamination, cloudy bubbled inner surface | Replace | The laminate itself has failed. Nothing bonds to it |
The rule of thumb: repair faults, replace fabric. A hole from kneeling on a rock is a fault and worth fixing. Holes appearing in new places every trip are the fabric reaching the end of its life, and no amount of adhesive changes that. If you are replacing, the budget end is covered in cheap waders that are worth buying, and the summer alternative is waist-high wading pants.
The picks in detail
Frogg Toggs Hellbender PRO Breathable Stockingfoot Chest Wader
Best for: The replacement that stops the repair cycle
When a pair has been patched three times, you are maintaining a failing garment rather than fixing a fault. This is the pair to replace into: a four-ply breathable upper with double-reinforced knees, which is the single most useful construction detail on a wader because knees are where fabric abrades first — every time you kneel on gravel to land a fish or climb a bank. Stockingfoot, so your existing boots carry over.
- Construction
- Breathable 4-ply nylon upper
- Height
- Chest
- Foot
- Stockingfoot, 4mm neoprene
- Knees
- Double-reinforced
- Reinforced knees address the most common abrasion point
- Four-ply fabric resists the pinholes that start most leaks
- Takes the wading boots you already own
- Costs three times a budget pair
- A chest wader is warm for summer creek fishing
BASSDASH Men's IMMERSE Breathable Stockingfoot Chest Waders
Best for: The mid-price replacement, with pockets
A sensible middle option if your old pair has failed and you do not want to spend premium money again. Breathable stockingfoot construction with zippered chest and hand-warmer pockets, at a price between the budget pairs and the reinforced ones. Buy it understanding the trade: fewer reinforcement panels than the Frogg Toggs pair, so look after the knees and keep a repair tube in the car.
- Type
- Breathable stockingfoot chest wader
- Pockets
- Zippered chest, hand-warmer
- Feet
- Neoprene bootie, boots separate
- Useful pocket layout for anglers who fish without a pack
- Breathable and stockingfoot at a mid price
- Boots carry over from your old pair
- Less knee reinforcement than the top pick
- Mid-price fabric still wants careful storage
TIDEWE Chest Waders for Men and Women, Waterproof Fishing Waders
Best for: The cheap stopgap when a repair has to wait
Sometimes the honest answer is a cheap bootfoot pair to get you through the season while you decide. These cost about what two tubes of repair adhesive and a wasted Saturday cost, the attached boots mean nothing else to buy, and they will keep you dry for a reasonable number of trips. Treat them as a stopgap rather than a long-term wader — the attached boot is the part that limits them.
- Height
- Chest
- Boots
- Attached (bootfoot)
- Sizing
- Men's and women's
- Cheapest way back onto the water
- Attached boots — nothing else to buy
- A reasonable spare to keep in the vehicle
- Attached rubber boots give little ankle support
- Not built for the same number of seasons
Prices shown are from Amazon as of October 20, 2026 and change often — the button always goes to the current listing. Some links may earn us a commission at no extra cost to you. How this works.
Frequently asked questions
How do you find a leak in waders?
Turn them inside out, take them into a fully dark room and shine a bright flashlight along the inside while looking at the outside — pinholes show as bright points. For holes light misses, wipe a dry suspect area with rubbing alcohol: it soaks straight through a pinhole and shows as a dark spot inside.
What is the best thing to repair waders with?
A flexible urethane wader repair adhesive, applied thinly from the inside over a coin-sized area and cured flat for 24 hours. UV-cure wader patches are the right thing to carry in a pack because they set in minutes in sunlight. Neoprene cement is the correct material for bootie seams.
Can you use duct tape on waders?
Only to finish one session. Duct tape leaves adhesive residue that prevents a proper repair bonding later, and it can lift the coating off breathable fabric when removed. Silicone sealant, hot glue and super glue are worse — they all turn a repairable leak into a permanent one.
Why do my waders leak at the knees?
Abrasion. Kneeling on gravel to land fish or climb banks wears the laminate at a single point until pinholes form, which is why reinforced knees are the most useful construction feature on a wader. Bunched fabric flexing in the same place, usually from a poor inseam fit, causes the same failure at the crotch.
When should I replace waders instead of repairing them?
When new holes appear in different places each trip, when seam tape is cracking in several places, or when the inner surface looks cloudy and bubbled. The first two mean the fabric or the tape adhesive has aged out generally; the third is delamination, and nothing bonds to a delaminated laminate.
Sources
Keep reading
Not sure where to start?
The beginner gear guide walks you through exactly what a new stream angler needs — the six essentials first, nice-to-haves later, with one safe-default pick per category.